Weber 44 DCNF part help

discussions specific to the 750 Paso

Moderators: paso750, jcslocum

User avatar
paso750
paso grand pooh-bah
Posts: 5560
Joined: Sun Jul 18, 2004 12:00 am
model: 750 Paso
year: 1987
Location: southern Germany

Re: Weber 44 DCNF part help

Post by paso750 »

Jason,

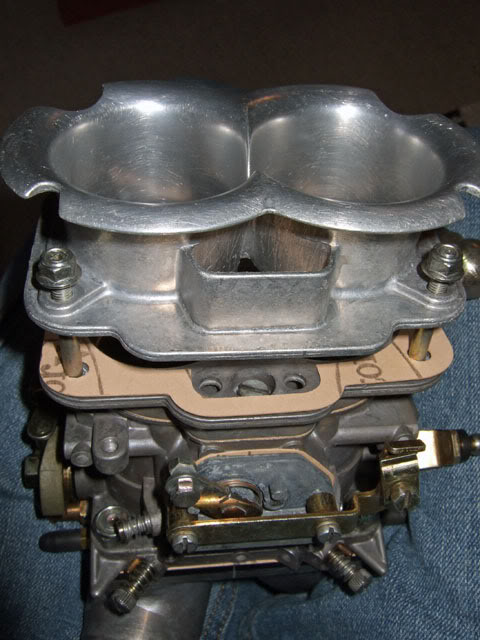
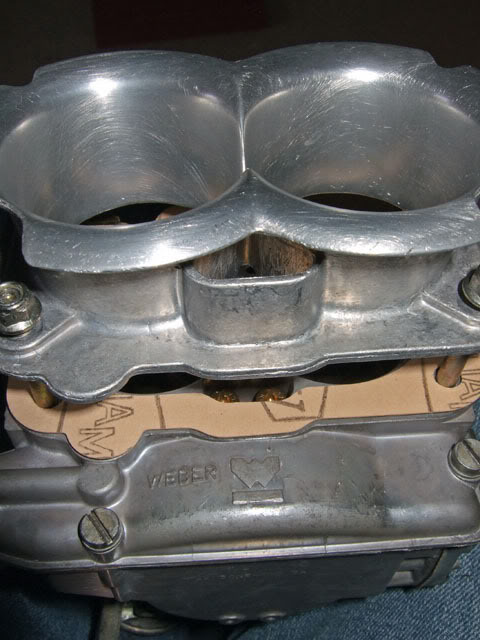
is that the right airhorn ? I`m just wondering as this is the original one (front and rear view) and it has those scoops on both sides ie for the starting jets. Yours has a completely closed bottom plate. Could that be for a sidedraft Weber instead ? I have no clue, just noticed the difference.
Image
Image

G.
Jason
Posts: 10
Joined: Wed Jun 08, 2011 9:59 pm
model: 750 Paso
year: 1988
Location: Houston ,Texas

Re: Weber 44 DCNF part help

Post by Jason »

I'm not sure... it is listed for a DCNF.... don't think the ever side drafted one of those. I could be wrong though. I haven't bought it yet, but it looks like the next best thing to stock. I could notch that area if it covers any jets. I could also fab up that little "scoop" on both sides if necessary. I would prefer the stock piece but that search has proven difficult at best. higgy has one... but he won't be able to get to it for 6 months. I would kinda like to ride before December if you know what I mean.
User avatar
paso750
paso grand pooh-bah
Posts: 5560
Joined: Sun Jul 18, 2004 12:00 am
model: 750 Paso
year: 1987
Location: southern Germany

Re: Weber 44 DCNF part help

Post by paso750 »

DCNFs were downdraft.
This shop in Italy sells the right airhorn http://www.ricambisport.it/ing/ricambi_ ... 143&id=119

G.

edit: considering the one from Pierce manifolds is $86.45 (+ shipping I guess) the total may be the same. (€50=$60.15) Don`t know what they charge for shipping to the US. They could put in an envelope/jiffy bag and send it as recommended letter which would be the cheapest but I don`t know if they do that.
jayh
Posts: 247
Joined: Thu Oct 22, 2009 10:38 am
model: 750 Paso
year: 1986
Location: Mildura ,Australia

Re: Weber 44 DCNF part help

Post by jayh »

That should be fine Jason.Identical to my setup as a matter of fact,except for the air horn.You should be able to drill some holes for the air correctors and chokes in that one if they havn't provided any ventilation.The spacer now looks identical and the air filter is the same dimensions. The above picture of the airhorn,illustrates the point that I made earlier about vacuum leaks.You can quite clearly see the tops of both the air correctors sitting in their ports,then on the airhorn you can see the vent that they should be breathing through.Now look closely at the gasket,or lack thereof,if you were to screw the airhorn down like this the air correctors would be under the influence of a vacuum source,and one of the biggest issues in tuning the weber is getting them working at low revs.The last thing you need near the top of their inlets is a vacuum source drawing air away from them.This is why the airbox base is important as it effectively cuts off any airflow back into the main chokes from the air corrector port,by slipping down inside the main choke a mm or 2.I will be putting a spot of sealant on mine during the final fit off.Don't put the air cleaner base on the carby first as it will do the same thing as the gasket is doing in above picture.First the black spacer (already trimmed for you,nice work !),then gasket,air cleaner base,air horn,tighten up nuts,then rest of air cleaner.If it is the K&N then there's enough room to fit the tank back on.

Just one or two other points,The float level is important,too low and too much vacuum is required to start the main jet circuit working at low revs.Too high and fuel will drip out of the little aux. venturys in the middle of each carb barrel.(no vacuum required,not good,could fill your sump up with fuel).If you unscrew your main jet stacks and look down inside the port with a flashlight,you can switch your ignition on and watch how high up the fuel comes to the little feed tube that feeds across to the auxillary venturys.46mm is stock and is well below, 45 raises the level ,44 be careful at this point as your getting close to having fuel dripping,I try to get mine a mm or so below the feed tubes,then start the engine and run it for a while with me sitting on the bike,(not on the centre or side stands),switch it off,make sure fuel is not dripping out of the aux venturys.Then as a final check I unscrew a main stack again and check with the flashlight that it is nowhere near running out on it's own accord(at least a mm below the tubes).Keeping the fuel up nice and high will make tuning easier.I think that ducati erred on the side of caution with their 46mm setting,so as to avoid mistakes with float level adjustment causing mayhem.Just lifting the height 1mm is an improvement.

The chokes have a habit of playing up on these carbys.If you are having trouble setting your idle mixture on one barrel or the other (wind the idle mixture screw all the way in and the revs don't change/engine doesn't die) then it's getting fuel from somewhere else probably the choke circuit.A lot of the car guys,tap the top of the tubes and put a grub screw to hold them closed permanently.No choke,No problem.You might find that you need your choke if you play around with your jetting so....What I did is remove the little brass circlips that retain the spring and plunger assy.remove the spring,I then got a drill a bit smaller than the hole in the plunger,wrapped some masking tape around it and used it to spin the plungers in their seats until I could see a nice seating area in the brass.(kind of like lapping valves on a cyl head).This helped with a tuning issue I had.You will also have to remove the external choke cover with actuating arms to do this.

Lastly,the idle speed adjustment is also important on these carby's,they recommend winding it in no more than 1 full turn after it contacts the cam.Play with this a bit as I have found that a bit more than this can be helpful to remedy a tendency to be either on or off throttle,which makes for some interesting cornering on the slower bends.This changes considerably from hot to cold ,as does the idle mixture so a good warm up is essential before fine tuning.

Start with the likely known faults of the carby,then... if all else is good ...start messing with your jets.If it ain't broke,don't fix it. Jay.
User avatar
higgy
paso grand pooh-bah
Posts: 3342
Joined: Tue Jul 29, 2008 9:50 pm
model: 907 I.E.
year: 1992
Location: Hilltown,Pennsylvania
Contact:

Re: Weber 44 DCNF part help

Post by higgy »

If you have your Weber jetted correctly,the choke has little effect until temps are in the freezing zone.
The difference in the airhorns, one is for Fiats and bikes the other is for Maseratti and Ferrari, and Lambo's

Please excuse my absence, I'm on the road for the next 6 months and workin my as off :smoke:
When it's proper turn the key on,count to 10, 3 squirts on the pump and hit the starter.All will be good and it will even idle proper................ :choo:
Ducati,making mechanics out of riders since 1946
There's no problem so bad that a little fixing can't make it worse! : )
Electrocuted Birds Are Bursting Into Flames and Starting Wildfires :roll:
88 750
90 906
92 907ie
Jason
Posts: 10
Joined: Wed Jun 08, 2011 9:59 pm
model: 750 Paso
year: 1988
Location: Houston ,Texas

Re: Weber 44 DCNF part help

Post by Jason »

higgy wrote:The difference in the airhorns, one is for Fiats and bikes the other is for Maseratti and Ferrari, and Lambo's
So is this one the same as stock for the Duc? Image

I need to download a translator so I can read their web site.

Oh and by the way G. great find.... http://www.ricambisport.it/ing/ricambi_ ...143&id=119 .. looked everywhere so I thought..
User avatar
higgy
paso grand pooh-bah
Posts: 3342
Joined: Tue Jul 29, 2008 9:50 pm
model: 907 I.E.
year: 1992
Location: Hilltown,Pennsylvania
Contact:

Re: Weber 44 DCNF part help

Post by higgy »

yes, that is a picture of the standard Paso DCNF stack
Ducati,making mechanics out of riders since 1946
There's no problem so bad that a little fixing can't make it worse! : )
Electrocuted Birds Are Bursting Into Flames and Starting Wildfires :roll:
88 750
90 906
92 907ie
User avatar
paso750
paso grand pooh-bah
Posts: 5560
Joined: Sun Jul 18, 2004 12:00 am
model: 750 Paso
year: 1987
Location: southern Germany

Re: Weber 44 DCNF part help

Post by paso750 »

I need to download a translator so I can read their web site
There are three flags on the top right, just click on the union jack :) (the link posted was english)

A good way to find things sometimes is Googles picture search.
jayh
Posts: 247
Joined: Thu Oct 22, 2009 10:38 am
model: 750 Paso
year: 1986
Location: Mildura ,Australia

Re: Weber 44 DCNF part help

Post by jayh »

Hey Jason,What number is stamped on your accelerator pump cam on the weber ? thanks Jay.
Jason
Posts: 10
Joined: Wed Jun 08, 2011 9:59 pm
model: 750 Paso
year: 1988
Location: Houston ,Texas

Re: Weber 44 DCNF part help

Post by Jason »

The only number I see on the cam is 10. It is located in the middle of the profile.

After following your tuning tread I checked all my jets. Idles 57, AC 170, Mains 150, Starting jet 110F7. And check out the tubes(incase pic doesn't come out right... arrows are the soldered closed holes).
filled holes.JPG
filled holes.JPG (108.09 KiB) Viewed 12351 times
I ordered the airhorn from that place in Italy (man the American dollar is crap these days) and G. is sending me the airbox spacer. I still need to order the same jet setup you have.
User avatar
paso750
paso grand pooh-bah
Posts: 5560
Joined: Sun Jul 18, 2004 12:00 am
model: 750 Paso
year: 1987
Location: southern Germany

Re: Weber 44 DCNF part help

Post by paso750 »

I`m everything but a carb specialist but the same jet setup is not necessarily the right one specially due to the lack of an airbox.
Do you both have the same original exhaust and header ? As there were two header sizes this could also make a difference.

G.
jayh
Posts: 247
Joined: Thu Oct 22, 2009 10:38 am
model: 750 Paso
year: 1986
Location: Mildura ,Australia

Re: Weber 44 DCNF part help

Post by jayh »

Hi Jason,G is right your aircleaner/exhaust setup will affect the jetting as will,climate and elevation,which from a previous post of yours would appear to be very similar to where I live,your aircleaner setup is the same,the only thing that is unclear is your exhaust system.I have conti race cans on mine,so it will tend to run leaner than stock.

Anyway regardless of your exhaust,I would get a set of 55 idles and perhaps a set of 54's just in case and stand by for an update on the pump cam.This will fix 75 % of your problems

if your impatient like me you could also get a set of larger air correctors 185,works ok.and a couple of sizes of mains 160,165 or 170 which I am currently using but are a tad rich.

Or.... you could just wait and see how the pump cam changes everything

As a matter of fact,I think that I would be putting it back together as is ,without the pump cam fitted and seeing if this sorts out some of your problems before I ordered anything else.

you have to undo the 4 screws on the pump diaphragm to get the cam off the shaft,and use a small spanner on the end of the shaft to hold it while you undo the securing nut,otherwise you could bend the throttle shaft and put the butterflies out of alignment,so be carefull with it.You can then gently prise it of the shaft with a thin screwdriver,going from side to side so as not to break anything

As you have the 10 cam fitted I would expect you to find an immediate improvement in low speed operation,and then it will probably go flat from about 1/3rd throttle while accelerating,this is to be expected,and this is where your cam needs to start pumping,not stop (as it currently does).

As for your frankenstein emulsion tubes well I wouldn't be too concerned just yet,but for your curiosity here's my setup.
Starting from the top side of the little step that the air corrector slips down to and measuring down the tube (the join line between the emulsion tube and air corrector in your photo)
my rows of holes measure as follows.
(lower side of step tube outside diameter 4.7 mm)
13.5 mm to centre of holes,4 holes @ .8 mm
(14.5 mm the diameter of my tube increases by 1mm at this point to 5.7 mm)
15.5 mm to centre of holes,4 holes @ 1.0 mm
20.0 mm to centre of holes,2 holes @ 1.0 mm

As I said don't be concerned with your tubes until you get everything else sorted.You probably won't end up touching them,I placed a lot of emphasis on them ,when I should have been looking at the pump cam instead. :banghead:
I now think that time spent developing a 'Paso profile cam' is going to be time better spent. Jay.
User avatar
paso750
paso grand pooh-bah
Posts: 5560
Joined: Sun Jul 18, 2004 12:00 am
model: 750 Paso
year: 1987
Location: southern Germany

Re: Weber 44 DCNF part help

Post by paso750 »

so hard to find and then there`re suddently three :) :banghead:
http://cgi.ebay.de/Ansaugtrichter-Maser ... 4aad157d63
User avatar
higgy
paso grand pooh-bah
Posts: 3342
Joined: Tue Jul 29, 2008 9:50 pm
model: 907 I.E.
year: 1992
Location: Hilltown,Pennsylvania
Contact:

Re: Weber 44 DCNF part help

Post by higgy »

G is that what you need :?I have 3 myself, you are welcome to one if you like :smoke:
Ducati,making mechanics out of riders since 1946
There's no problem so bad that a little fixing can't make it worse! : )
Electrocuted Birds Are Bursting Into Flames and Starting Wildfires :roll:
88 750
90 906
92 907ie
Post Reply